


There are lots of places in this mini album for you to add photos, tags and journalling and would make a lovely gift for a friend or relative either left empty or filled with photos.
To start with you will need 6 DL envelopes. I used brown ones as they seem to be a bit stronger than the white ones I had.
Trim the end of the envelope opposite the flap end so you have 2 opening ends. Score at 9 cm from the end you have just trimmed and fold. Do this on all 6 envelopes.

Apply strong adhesive about 0.5 cm above the fold . This allows for expansion of your finished album. Do this on all 6 envelopes.

Apply adhesive (I used my atg gun for this) around the rest of this folded bit.

Stick this to the back of the next envelope matching the folds.

The folds will form the spine of your book.

Do this with all 6 envelopes

and it should look like this

Cut 12 pieces of assorted card 15 cm x 10.5 cm to decorate the pages. Score at 9 cm and fold. I used distressing ink on the edges of my card so if you want to do that it's best to do it now.

Close the book so the flaps are on the right hand side.

Insert the short edge of the card you have just folded, into the flap. Put glue onto the flap and stick it to the back of the card you have just slotted into the opening.
 front
frontback


Insert the next piece of card into the opening behind the original envelope flap so that the fold is in line with the fold of the envelope flap and the piece of card

Put adhesive on one side of the card and glue the two pieces of card together. The edges should match up but if the front piece is a bit too long it can be trimmed off later.

Do this on all 10 of the pieces of card.
The back page will look like this with a loose flap which we will glue down later.
 |
The front will look like this
 |
| until you add the front cover. |
Now cut 6 pieces measuring 8.5 cm x 10.5 cm. These are for the left hand side of your pages. If you are distressing the edges, do this now.
Next cut 6 pieces 12.5 cm x 10.5 cm which will cover the right hand side of your book. Distress the edges if you want to.

Stick these down to the right hand side of your book.
It should now look like this


The back and front still need finishing but before we do that, cut half circles from the right hand side pages as shown in the photo to make tags, photos or journalling easier to pull out.
Be careful when place the punch in the pocket as you don't want to split the opening.

Covers
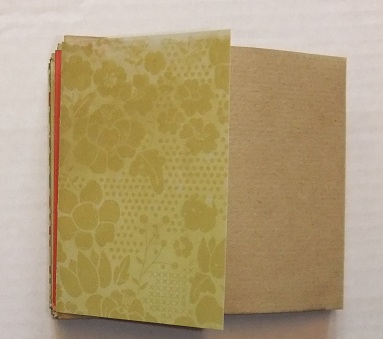
Take some card - I used some old packaging and cut it to the size of your book. Mine measured 13cm x 11.2 cm. I distressed the edges and covered the front with papers both sides and the back just one side.
If the papers/card you are using for the rest of the book is thick enough, use this for your covers as I did in the blue book.
Stick the flap of the card down on the back and stick the cover over the whole of the back.
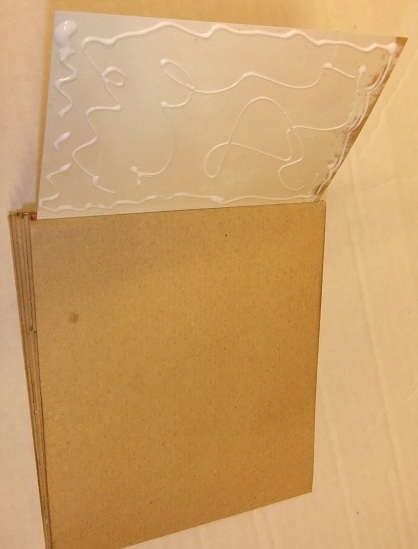


Stick cover to front.
 |
| Back and front cover |
I had lots of off cuts of card so I made these into tags and mounts for photos and popped them into the pockets.


Now you can decorate it to your hearts content.
I've just done the front cover of this little book as I have decided I'm going to use it for my Journal your Christmas. I'm quite pleased with it:)

I hope you enjoyed this project and if you make this little book I'd love to see it so leave me a link in the comments book. Thank you.
If you have any problems in understanding this please contact me and I'll do my best to answer your questions!
6 comments:
Oh that's gorgeous - I'm inspired to dash off and make a mini album now (mind you anything's better than cleaning caravans!!)! Seriously I love it and I love the idea of a 'Boasting book'. Won't the other grannies be jealous of such a beautiful thing xx
hi blog master i see your Dl Envelopes and i really like it i am inspiring your idea and good looking these dl envelopes good work
Wow this is fab, I've printed it to make when I come back thanks so much that must have taken you ages.
Susi this is just superb, I adore it and I'm not surprised you have nabbed it for JYC. I will try and have a go at this, you know I will be asking for help :)
What are those papers with the spots on please?
Jen xx
What a great little book! I have the perfect bunch of pictures to go in it xx
I've blogged it now with a link back here and yours Susi :) Thank you again.
Post a Comment