Wednesday, 30 November 2011

Creative Craft World Christmas Countdown - Christmas wall hanger

Today's lovely wall hanger is made by Trish and you can find full details on her blog, Doodles and Swirls.

This is the last of Creative Craft World's Countdown to Chr.istmas projects  and I hope you have enjoyed them.  If you make anything from our Countdown, please leave a link at Creative Craft World by the end of December and the best one will receive a small prize

Tuesday, 29 November 2011

Countdown to Christmas - calendar

Check out Sue's blog, Me and Mine for our penultimate project, this lovely calendar.
Tomorrow is our final day so I hope you find the time to pop back then and see what is on offer.

Monday, 28 November 2011

Countdown to Christmas - cards

Two super cards from our guest designer, Phil today.

Check out her gallery on UK Scrappers for more examples of her lovely work.

Sunday, 27 November 2011

Countdown to Christmas - a mini book

Today Nora is showing us how to make this lovely book.


Pop over to her blog, I scrap life for further details.

Saturday, 26 November 2011

A proud sister moment

This is my brother's store:)

Countdown to Christmas - December scrapmap

Today we have a sketch for you to have a play with.
This is my interpretation of it - I have turned it round so the photo is portrait.

Have a go and link it to the Creative World blog and you could win a month kit and a chance to be a guest on the design team.
See you tomorrow for another Christmassy project.

Friday, 25 November 2011

Countdown to Christmas - Sweetie jar and card

What a lovely idea for a present this is.
Trish has made this beautiful card and decorated the jar as a birthday gift for her sister.  Check out her blog, Doodles and Swirls for more details.

Thursday, 24 November 2011

Countdown to Christmas - sweetie bags

It's the penultimate day today for Creative Craft World's Countdown to Christmas and Lou has another lovely project for us today - some sweetie bags.
Pop along to her blog, All things crafty for the details.

Wednesday, 23 November 2011

Tuesday, 22 November 2011

Countdown to Christmas - altered letters

Today it's the turn of K, our guest designer,  to show us how to make these lovely letters.
Check out the instructions on her blog and I hope to see you tomorrow when Sue will be showing us how to make a fabulous book to keep a record of all your birthdays.

Monday, 21 November 2011

Birthday card and a layout

This is Lucy's birthday card - I've gone with a baking theme as I'm buying her some baking stuff for her birthday.
Click on the pictures to make them clearer.


Lots of cutting out and colouring in but that's what I like doing best:)  It just takes me ages though.

The weekly challenge (last week) was to use autumn colours/photos, unusual sized photos, glitter or bugs and paint.


I used paint on the letters then covered in matte accents.

Countdown to Christmas - birthday book

Sue has been very busy making lovely projects for the Countdown to Christmas and it's her turn again to show us how to make this super birthday book.

Pop along to her blog Me and Mine for full instructions.

Sunday, 20 November 2011

Countdown to Christmas - crackers

Wow!  Look at the stunning crackers Sue has made for us.  Pop over to her blog Me and Mine for full instructions.
Sue will be back again tomorrow and she will be showing us how to make a fab birthday book.  I hope to see you then.

Saturday, 19 November 2011

Countdown to Christmas - an altered frame

It's the turn of Nora today with a super piece of art.  The instructions for this lovely altered frame can be found on Nora's blog, I Scrap Life.


Pop back tomorrow for some crackers!

Friday, 18 November 2011

Countdown to Christmas - cards

Trish has made some lovely cards for us today on the Creative Craft World Countdown to Christmas.


Pope along to her blog, Doodles and Swirls for further details.

I hope to see you tomorrow for another crafty project.

Thursday, 17 November 2011

Countdown to Christmas - Table Gift


Welcome to my third project for you - a simple table gift to use at Christmas or at a dinner party, just use different cardstock.


You will need:
Small box of 5 After Eight mints
Double sided paper/cardstock
Adhesive
Border punch
Circle punch
Button
Rosette die


I have used plain card so you can see my scoring lines better.

Cut a piece of the paper/cardstock to 8” x 2 ½”

Score at 1”, 3 ½”, 4 ½” and 7” and fold along score lines.

Glue the two end tabs together and set aside.


Cut a piece of the paper/cardstock to 8 ¼”  x 2 ½”

Score at 2 ½”, 3 ½”, 6” and 7” and fold along score lines.  This second piece will have a flap on it.


Still on the second piece, place glue onto middle 2 ½” square and attach other piece of cardstock making sure that the openings  are as shown in the photo.  Wrap around and place glue on other square, completing the box.


Decorate as required .  If you attach rosette to bottom half of box and not the lid and only glue the bottom part of it, your flap will tuck in behind the rosette to keep it closed.  Add a name or any other decoration you feel necessary. 

I hope you'll have a go at this very simple but effective little box.  If you do, leave me a link so I can come and have a look.

Wednesday, 16 November 2011

Countdown to Christmas - more Christmas card ideas

Today in the Countdown for Christmas on Creative Craft World, Nora is showing us how to make these two beautiful Christmas cards.  You will find full instructions over on her blog, here.

Pop back tomorrow when I will be showing you how to make a table gift.

Tuesday, 15 November 2011

Countdown to Christmas - Gift tags

Today, Lou is going to show us how to make these rather super gift tags.
You'll find full instructions on her blog All things crafty, here.

Check back tomorrow for some more Christmas card ideas.

Monday, 14 November 2011

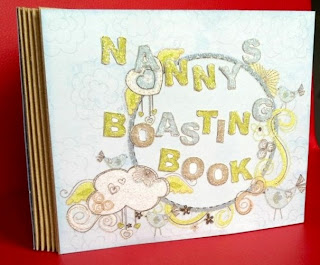
Countdown to Christmas - Nanny's Boasting Book

It's my turn again for a project so I'm going to show you how to make this fab little book.  I saw a book similar to this a couple of years ago but didn't keep the link and have made it from memory so the instructions may look a bit complicated!  Sorry!!  The end result is definitely worth the effort though.


There are lots of places in this mini album for you to add photos, tags and journalling and would make a lovely gift for a friend or relative either left empty or filled with photos.

To start with you will need 6 DL envelopes.  I used brown ones as they seem to be a bit stronger than the white ones I had.
Trim the end of the envelope opposite the flap end so you have 2 opening ends.  Score at 9 cm from the end you have just trimmed and fold.  Do this on all 6 envelopes.

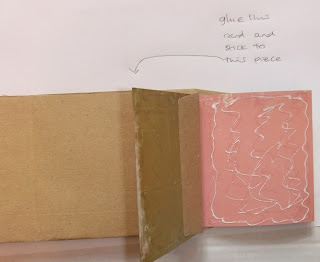
Apply strong adhesive about 0.5 cm above the fold .  This allows for expansion of your finished album.  Do this on all 6 envelopes.

Apply adhesive (I used my atg gun for this) around the rest of this folded bit.

Stick this to the back of the next envelope matching the folds.
The folds will form the spine of your book.
Do this with all 6 envelopes

and it should look like this

Cut 12 pieces of  assorted card 15 cm x 10.5 cm to decorate the pages.  Score at 9 cm and fold.  I used distressing ink on the edges of my card so if you want to do that it's best to do it now.


Close the book so the flaps are on the right hand side.

Insert the short edge of the card you have just folded, into the flap.  Put glue onto the flap and stick it to the back of the card you have just slotted into the opening.
front
back


Insert the next piece of card into the opening behind the original envelope flap so that the fold is in line with the fold of the envelope flap and the piece of card

Put adhesive on one side of the card and glue the two pieces of card together.  The edges should match up but if the front piece is a bit too long it can be trimmed off later.
Do this on all 10 of the pieces of card.

The back page will look like this with a loose flap which we will glue down later.


The front will look like this
until you add the front cover.

Now cut 6 pieces measuring 8.5 cm x 10.5 cm.  These are for the left hand side of your pages.  If you are distressing the edges, do this now.


Next cut 6 pieces 12.5 cm x 10.5 cm which will cover the right hand side of your book.  Distress the edges if you want to.


Stick these down to the right hand side of your book.

It should now look like this


The back and front still need finishing but before we do that, cut half circles from the right hand side pages as shown in the photo to make tags, photos or journalling easier to pull out.
Be careful when place the punch in the pocket as you don't want to split the opening.


Covers

Take some card - I used some old packaging and cut it to the size of your book.  Mine measured 13cm x 11.2 cm.  I distressed the edges and covered the front with papers both sides and the back just one side.
If the papers/card you are using for the rest of the book is thick enough, use this for your covers as I did in the blue book.
Stick the flap of the card down on the back and stick the cover over the whole of the back.


Stick cover to front.
Back and front cover


I had lots of off cuts of card so I made these into tags and mounts for photos and popped them into the pockets.


Now you can decorate it to your hearts content.

I've just done the front cover of this little book as I have decided I'm going to use it for my Journal your Christmas.  I'm quite pleased with it:)


I hope you enjoyed this project and if you make this little book I'd love to see it so leave me a link in the comments book.  Thank you.
If you have any problems in understanding this please contact me and I'll do my best to answer your questions!